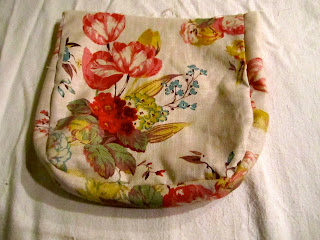
Materials Needed:
*1 yrd exterior fabric
*1/2 yrd lining fabric
*matching thread
*measuring tape
*marking chalk
*Fabric shears
*pins
*iron
*Sewing Machine
Choose a fabric that you love and lets work. I choose this floral pattern for the exterior of the bag, and a soft pink plaid for the lining.
Once you have chosen your fabric you need to cut out four pieces. Two of the exterior fabric and two pieces of the lining. I cut my pieces 13"x13". You can make them bigger if you want a larger bag. Or smaller if you like.
Next your going to fold the pieces in half and cut off a small rounded portion at the bottom as shown above.
This cut should shape your bag with a rounded bottom. If you don't care for the rounded look the previous step is not necessary.
Now you want to cut out the base of your bag. Use your measuring tape to measure around your bag from one end all the way around to the other. My piece was cut at 36"x3". It's OK if you cut a little bit more fabric then needed you can always clip it off once the pieces are sewn together. You want to make sure you follow this step for exterior pieces as well as the lining pieces.
Once all your pieces are cut out you should have three cut pieces per fabric choice. Prep your bag for sewing. Take one of your fabric pieces lay it right side up. Then take the long piece you cut out for your base and begin pining the two pieces together for sewing. Place them right sides facing together. (can't tell you how many times I have messed this step up). Once pinned in place use 1/2" seam allowance and sew the two together. Repeat this step until all thee pieces are sewn together. For the lining of the bag you want to leave a small 5" opening at the bottom of the bag on one side. It sounds crazy now but when your sewing both inside and outside together you will need to flip the bag inside out. So save yourself the headache and leave it open on one side for this purpose.
The end result should look like this. You should now have two complete pouches sewn together for the exterior and interior lining of the bag.
For the strap you want to cut out a pieces of fabric that measures about 45"x8". You can play around with this number depending on how long or short you want your strap to be.
Assembling the strap is pretty simple. Fold it in half the long way and iron it down. You should have an iron crease in the middle of the fabric once you open it up.
Once opened, fold fabric into the crease and iron on both sides.
If opened you should have three iron creases.
Now fold in half again and iron. Sew a closing stitch close to the edge of the strap to bind it close. I like to run a stitch on both sides for a neater look. Strap done!
For the opening flap if you chose to make one. My flap measured out to be 13"x10". You want to repeat the same steps from the beginning. Fold the fabric over once cut and cut one edge off for a rounded look.
Now it's time to sew it all together. Remember earlier when I told you to leave a 5" opening in you lining. Well it's going to come in handy now. First you want to pin all the pieces together to create a smooth seam. Think layers. The exterior of the bag should be right side out. Next you want to layer on the flap. Be sure to layer it the way you want it to appear when the bags right side out. Next you want to add your strap to the layer. Tuck your strap in so that it fits inside the bag when its wrong side out. The last layer should be the lining of your bag which should be wrong side out. Pin all layers in place and sew a 1/2" stitch across the top of the bag. This will bind all the layer. Now your strap, top flap and, exterior and interior lining should all be sewn together tightly.
Your almost done. Now flip the bag inside out, which means it should now be right side out. To achieve this you will need to pull the exterior layer if the bag through that 5" opening at the bottom. Once you have your bag right side out, sew the opening at the bottom of the interior lining close. Reenforce the top of the bag with a outer stitch arcoss the top of the bag the same way you did when it was inside out. This time instead of a 1/2" seam, sew as close to the edge as you can and you are done!
Heres what my bag looks like on the inside.
One more close up. Hope this tutorial wasn't too hard to follow. Happy Sewing!


