Monday

A World with No Kids......


Forgive me, but when I see a room that is decorated in all white everything I feel a bit of envy. It puts me in the mind of a world with No Kids. I had one hell of a weekend with the 2 & 4 year old in my home. Sometimes when things get really hectic I drifted off into my "Scrubs" bubble and retreat to a place like this. I mean can't you just image being in a place never touched by little fingers. No cheese and cracker residue, no juice stains, no toys to step on, and no noise. For some reason in my bubble my all white space is sound proof, it has the ability to block out all unwanted outside noise. I love the clean and crisp feeling all white gives off. Oh how I would love to be in a world where it's not required for me to cook and clean daily. Oh well, it's all wishful thinking at this point. Sometimes we moms just need an escape whether it be real or just in our minds.

Images courtesy of: A Daily Dose of DesignColor WatchCountry LivingRoom Envy

Friday

DIY Fun..... Recycle, and Reuse.... Felt Purse


I made this little Felt purse for my mother for Valentines day. I stuffed it with all kinds of goodies from Bath and Body works. She loved it and the goodies. It was the simplest thing to make and took under an hour to do. As adults we don't tend to grow out of our clothes as fast as children do, so plenty of my sons winter sweater get recycled into something fun. This purse was made from a wool felt sweater that was way too small for him, and I just could not give it to good will the fabric was way to nice so I held onto it until it found it's purpose. Below I explain how it was made and it's all done in just a few simple steps. 

Start by making sure the sweater is clean. Washing a wool sweater helps make the fabric easy to work with.

Next you want to cut off the sleeves of the sweater.

The neck line of the sweater is the next to go. This will makes the straps of the purse. Make sure you measure evenly on both side as to how wide you would like the straps.

Most sweaters have a ribbed bottom, cut that off and it will act as the bottom of the purse. 

Cut it to fit the bottom of the sweater and pin it in place in order to be sewn together. Be sure the bag is sewn inside out. You may be thinking well DUH Myisha, but Trust me I've had to redo plenty of things due to this small mistake. 

Once you are done sewing flip the bag right side out. You should come out with something like this.

I used the left over fabric to add some flowers and embellish the bag a little it. 
Happy Crafting!

Wednesday

I'm a Girly Girl.....


I am a girly girl, and I've been seeing these nails all over the Internet. I just saw an add yesterday with Serena Williams in it promoting this new nail color from OPI. I just had to have it. So I trotted on down to my local beauty supply, which seem to carry every shade of OPI you can think of. And there it was sitting on the counter just waiting for me. Yaaaayyyyyyyyyy. Just thought I'd share my new fun nail, I just Love them. I can't wait to see what other colors I can combined with this crackle finish.

So I Hear Your Coffee Table Needs Some Love....


I received an e-mail question recently about how to accessorise a round coffee table. Seems this person is at their wits end with coming up with ideas to fill a void in their living room space. I want to start with what I think is the most important thing to remember. "Less is More". I can't say it enough. Nothing bugs me more than clutter. As much as you hear size doesn't matter that's so not true. Maybe people aren't talking about coffee tables when they make that statement but it applies here as well. You don't want to put an over sized piece on your table that just won't flow. I like to go with small, medium, and large. A small candle paired with a medium size decorative bowl, and a large (but not to large) vase with some nice flowers in it will work on any table. Fresh flowers can get pretty expensive so save those for special events. Books on a coffee table are always a nice touch, doesn't matter if you read them or not just a nice touch. Don't be afraid to spice up your table with small splashes of color.  A dark room can be brought to life with a little color on the coffee table.Do you have a serving tray in the house that you don't really use? Grab it throw it on top of the coffee table with a small plant, some candles, and a few other nick-knacks for a well put together table setting. Lastly fresh fruit serves two purposes. One you can bring a sense of nature into your home, and secondly you'll be forced to eat it so it doesn't go bad. Any color apples, oranges, and lemons are eatable decor. Hope these few tips along with the images above have helped a bit with the table top dilemma. 


Images courtesy of:Decor PadFirst Price FixingHouse of HepworthsOut BlushThe Some Day

Monday

DIY Fun..... Side Table Edition


I just Love DIY Fun, don't you? I can't seem to find a night stand for my mom's bed room and it's driving me up the wall. I've run across a few good ones, but none seem to be "the one". So I think I'm just going to make one. Which works out as a win/win for me because I absolutely love watching things transform. Whether it's the old to the new, or just starting a project from scratch. It seems puts a smile on my face and brings a calm into my life. I started looking around on the web and came across these few DIY night stands or side tables that I thought were just the coolest. The first photo is simply a tray that has been glued onto a stool. So simple yet so chic. The next photo is a side table that is made of MGD, cardboard, and vinyl strips. I think this one is really fun. You can play with size and color, the possibilities are limitless. The next photo is of a side table that consist of an old directors chair, paired with a vintage suitcase. For all of you who love all things vintage ,but don't seem to have vintage money this is a great DIY project I'm sure your local good will or thrift stores will have the supplies there you need. Lastly the photo of the green side table has to be my favorite of them all. A picture frame, candle stick, some wood slats, and some paint and you have your very own hand crafted beautify chic side table.

Thursday

Happy St. Patrick's Day......


St. Patrick's day is Celebrated by the Irish community around the world. In our modern day culture the day consist of, wearing of the color green(this is where the shamrock comes into play), Church services, parades, Irish food and drinks and plenty of fun for adults, children, and the Irish at heart. There are a few place around the world where you can find a Green colored rivers or lakes on this day of celebration. This religious holiday is a feast day and celebration  of the death of Saint Patrick himself. St. Patrick is one of the most recognized of the parton saints of Ireland. Okay, just a quick history lesson for those of you out there that are like me, and could not remember what you were taught in school. With that said I'm putting on my"Kiss me I think I'm Irish" button and headed out for a day of fun filled activities for me and my little one. Happy St. Patrick's day Everyone. 

Tuesday

Party Favors.....


So one weird fact about my family is Tequila is the drink of choice hands down. Today we are celebrating one on my cousin's birthdays and you can't show up to a party with out party favors. A while back I did a post on these wine bags that I found on the Internet which are extremely easy to make click here. I thought I could kill two birds with one stone. A nice gift, and party favor all in one. Besides I've been dying to make one of these to give away. I have a few of my own but it's no fun when you don't share the love. Hopefully, well I can take that back I know she'll like the bag. And LOVE the gift inside. 
Just as a quick tip if you chose to make one of these bags. I like to sew the bag together instead of using bonding tape. It helps if you want to use the bag over and over again.

Monday

St. Patrick's Day is ah Coming.......


My son reminded me when he got home from school today that St. Patrick's Day is this week and he needs something green to where to school. Well he actually told me I HAD to make him something Green to wear to school. My son is the type of boy that will not come close to something that might remotely look like it's made for a girl, so I was a little stomped as to what I could make for him. I took to the net to do some searching around for some fun crafts of St. Patty's day. I came across these few crafts that I really liked, but my heart is telling me I will be making these for my nieces and not my son. I love those t-shirts that say "kiss me I'm Irish" maybe I can make him on of those. Or an over sized neck tie with some felt shamrocks attached to it. Who knows what I'll come up with. Check back in with me in a couple of days. I'm pretty sure I'll come up with something cool for him to sport to school. If you like any of the crafts above check the links below for how-to tutorials. 


Images courtesy of : Tiny PrintsSunshine CreationsMartha StewartCraft FoxesAll Things Cupcakes

Friday

Little Miss Piggy... Take 1.


I'm meeting with a client today that apparently loves Little Miss Piggy. Um okay, if you like it I'll design around it. This is presentation board #1 Little Miss Piggy style. Because this bedroom is not for a small child or teenager for that matter I thought I'd keep it simple and clean with a color palate that only consisted of three colors, pink, black,and white. For me black and white always evokes a sense of sophistication in a space. The pink goes without saying, I mean it's Little Miss Piggy. I added a few silver pieces in the mix for extra flare. I don't know about you but when I think of Miss Piggy I think High Glam. So I wanted to give the room a glamorous feeling while keeping it simple at the same time. Less is more. One nice size photo of Miss Piggy herself over the bed is an easy way to show case the love for her favorite childhood character. Crossing my fingers on this one.

Tuesday

I Love to make Pretty things, Now you can too... Felt pillow Tutorial


So I made the pretty little pillow last night that I will have for sale in my Etsy shop soon enough. I thought It would be a good idea to show you all how to make one as well. Don't worry if your not the DIY type but you like to pillow my advice, just buy one =). If you are like me and like to do it yourself below is a how to tutorial for this pillow. Feel free to use your own colors and style if you want to mix it up a bit.

What you'll need for this project:
1yrd felt fabric
Ruler
Scissors
Sewing Machine
Tread to match fabric
needle
3" & 2" circles
stick pins
Pillow insert

So lets get started. At this point you should have all the materials necessary to make this pillow. Start by measuring your pillow so you can cut your fabric to fit. My Pillow is 16"x16" so i cut out two 17"x17" panels of felt for the exterior of the pillow. Allowing a 1/2" seam to sew the pieces together.
Next I used my 3" and 2" circles to draw the petal templates onto the felt. For this pillow I used about 12, 3" circles and 10,  2" circles. The bigger the flower the more petals you will need.

Cut them out

Then you want to cut them in half.

I like to lay the petals out to get a feel of what the flower will look like before I get to the sewing machine. Quick tip: I like to put a small fold on the petals to give them more dimension, this will cause you to use a few more petals. So if you want to do it that way don't throw away your scraps just yet you can make a few more petals from it. 

On to the fun part. Now that you have figured out what you want your pillow to look like it's time to get to sewing. Lay the petals out one layer at a time. Pinning them down to the exterior piece of fabric. 

Sew each layer until you get to the center. If you don't have a sewing machine hand stitching works as well. Quick Tip: when sewing the petals, the closer to the center you get the harder it is to get the fabric under the foot of the sewing machine. Try popping if off (the foot) and reattaching once you've gotten your needle in place.

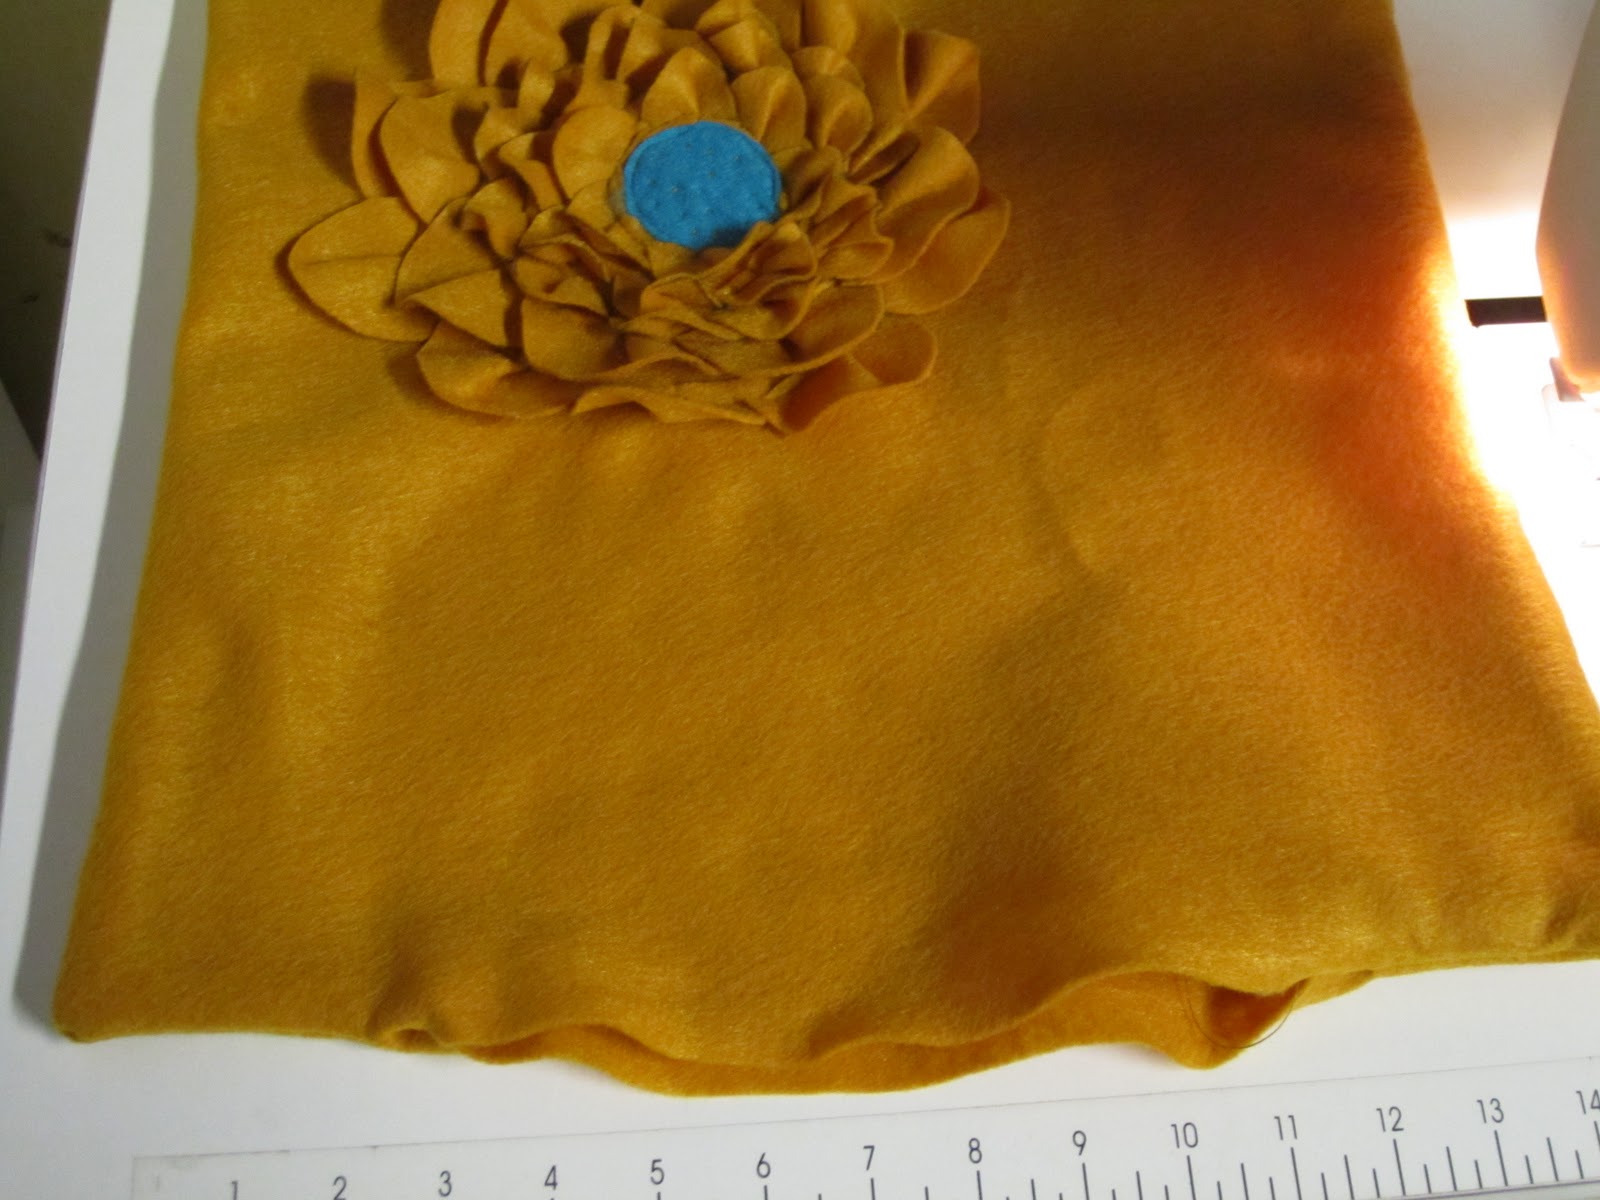
For the center I stitched a Blue Felt circle. Using the same tread I also stitched a few little dots in the center.

Next you want to sew the two fabric pieces you cut out earlier together to make the pillow. Be sure to line them up correctly. They should be sewn inside out. Leave a 4-5 inch opening at the bottom so you will be able to turn the pillow cover to its right side out.

I've learned that if you snip the edges right above the seam, when you turn the pillow right side out you get nice sharp pillow edges. Best Tip I've learned in years.

Flip the pillow covering right side out and it should look like this.

Hand stitch the bottom of the pillow to close it. Tuck the edges inside, pin it and sew and your done. Happy Crafting, hope y'all enjoyed making pillows with me.